Responsive Menu
Add more content here...
Search

Easy baked white fish with vegetables

Jump to Recipe
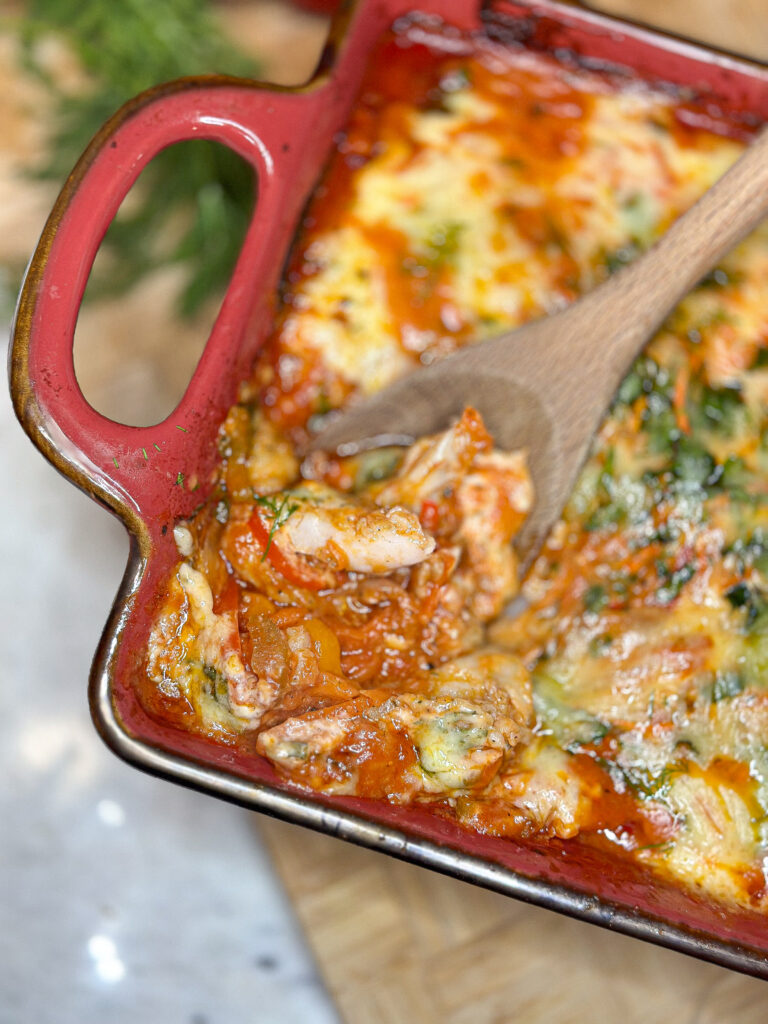
Easy baked white fish with vegetables in a red casserole dish with a wooden spoon scooping out some fish

 This is one of our favorite fish recipes! Easy Baked White Fish with Vegetables is baked in between layers of nutrient-rich vegetables like onion, carrots, celery, peppers, tomatoes, and fresh herbs. The result is a flaky white fish that’s tender and flavorful. Give it a try and enjoy a comforting and healthy meal!

A succulent and tender white fish is baked along with a generous amount of vegetables, such as onions, carrots, celery, bell pepper, tomatoes, garlic, and fresh herbs. All the flavors blend together to create a scrumptious dish that satisfies your hearty cravings yet still leaves you feeling light and satisfied. It will leave you wanting to add this to your list of favorite recipes. The recipe is packed with vegetables, making it healthy, yet even children love the delicious flavors of this dish.

Save this recipe to your Pinterest!

AS AN AMAZON ASSOCIATE, THIS POST MAY CONTAIN AFFILIATE LINKS. THIS WILL NOT CHANGE YOUR PRICE, BUT IT WILL SHARE SOME COMMISSION WITH OUR FAMILY.

What type of white fish fillets can you use?

Here are a few great options. You mostly want to choose firm white fish (you can use fresh fish or thawed fish). The best kind of fish, in my opinion, is swai fish. It is affordable and has a mild flavor.

  • swai
  • cod fillets
  • tilapia 
  • sea bass
  • grouper

Enjoy this easy-baked white fish with fresh, no-knead crusty bread

Tools you will need

This recipe is made of simple ingredients you can easily find in your local grocery store. My entire family loves this delicate fish recipe over creamy mashed potatoes, crispy new potatoes, sweet potatoes, or long-grain rice. This recipe for easy baked fish is perfect for meal prep for busy weeknights, dinner parties, or any occasion where you need a whole dish that everyone will love. 

ingredients laid out on a granite countertop to make easy baked white fish with vegetables such as: swai fish fillets on parchment paper, celery ribs, fresh parsley, carrots, bell peppers, onion, garlic, mayonnaise, and tomato puree

Ingredients

  • 2 1/2 pounds swai fish 
  • 2-3 tablespoons oil (olive oil, ghee, grape seed, avocado)
  • 2 large onions – thinly sliced
  • 4 carrots grated
  • 3 celery stalks
  • 4 tomatoes- grated without skins (or 12 oz of tomato puree)
  • 1/2 cup milk or broth
  • 3 large bell peppers (red bell pepper, yellow bell pepper, orange bell pepper)
  • 4 cloves of fresh garlic (pressed)
  • salt and pepper 
  • Vegeta seasoning (optional)
  • 2 tablespoons mayonnaise – you can also use Greek yogurt or sour cream
  • 1/2 bunch chopped fresh parsley

How to make baked white fish with vegetables

Pat dry the fish with a paper towel to remove excess moisture. (Im using swai fish)

Pour oil into a large nonstick skillet, just enough to cover the bottom (about a tablespoon). Place on medium-high heat to warm up.  Season the fish on both sides with salt and ground black pepper. Be light-handed with the salt on the fish. 

Sear the fish for about 2-3 minutes on each side. It should still be partly raw in the center. Cook the fish in batches until it’s all partly cooked. Transfer the fish to a plate while you prepare the vegetables.
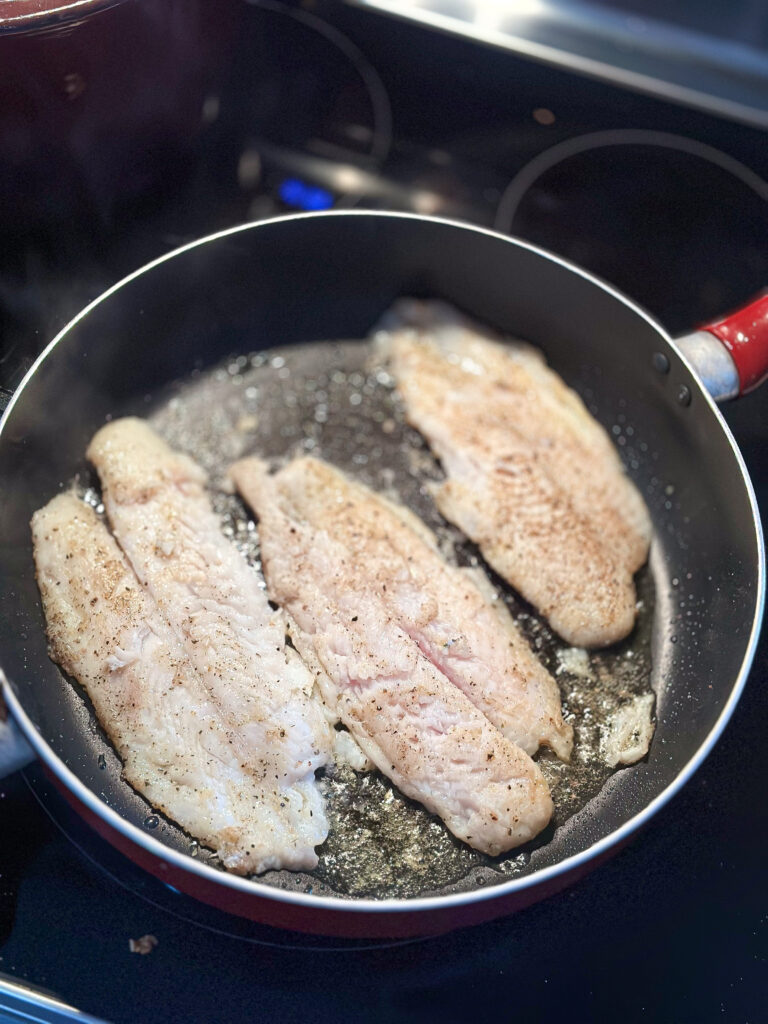
seasoned swai fish sautéing in a black skillet on the stove

Peel and halve the onions then thinly slice them, julienne the bell peppers, and slice the celery into thin strips. Clean and grate the carrots as well as the tomatoes. The skin of the tomato should stay behind. ( or you can use crushed tomatoes from the can) Peel the garlic and then mince them using a garlic press.

Add another tablespoon of oil to the same skillet as you cooked the fish in, heat the skillet back to medium-high heat, then add the onions, carrots,  bell peppers, and celery to the skillet. Season with salt or Vegeta (about 1 tsp) and ground black pepper (1/4-1/2 tsp). Cook for 5-7 minutes, until the vegetables soften. Add the tomatoes, milk, and garlic. Give it a good mix, taste the salt, and season to taste. Cook for another 8-10 minutes.

julienned vegetables cooking in a large skillet on the stove with a rubber spatula mixing it

Turn the heat off, then add the freshly chopped parsley and dill. 

Assemble into a deep baking dish.

Layer half of the fish in the bottom of the baking dish, then spread half of the vegetables over it. Spread one tablespoon of mayonnaise over the vegetables.  Then, layer the rest of the fish over the vegetables. Spread the remaining vegetables over the fish. Then, finish off with another tablespoon of mayonnaise. Sprinkle with some cheese. This is optional, but who doesn’t love a little cheese? Am I right!? 😉

assembled easy baked white fish in a red casserole dish on a granite countertop

Preheat the oven to 350 degrees. 

Cover the baking dish with either a lid or aluminum foil, then bake in the oven for 30 minutes or until the vegetables are soft and the fish is fully cooked. Add freshly chopped parsley and dill over the easy baked white fish with vegetables. And enjoy over some long grain rice or mashed potatoes!
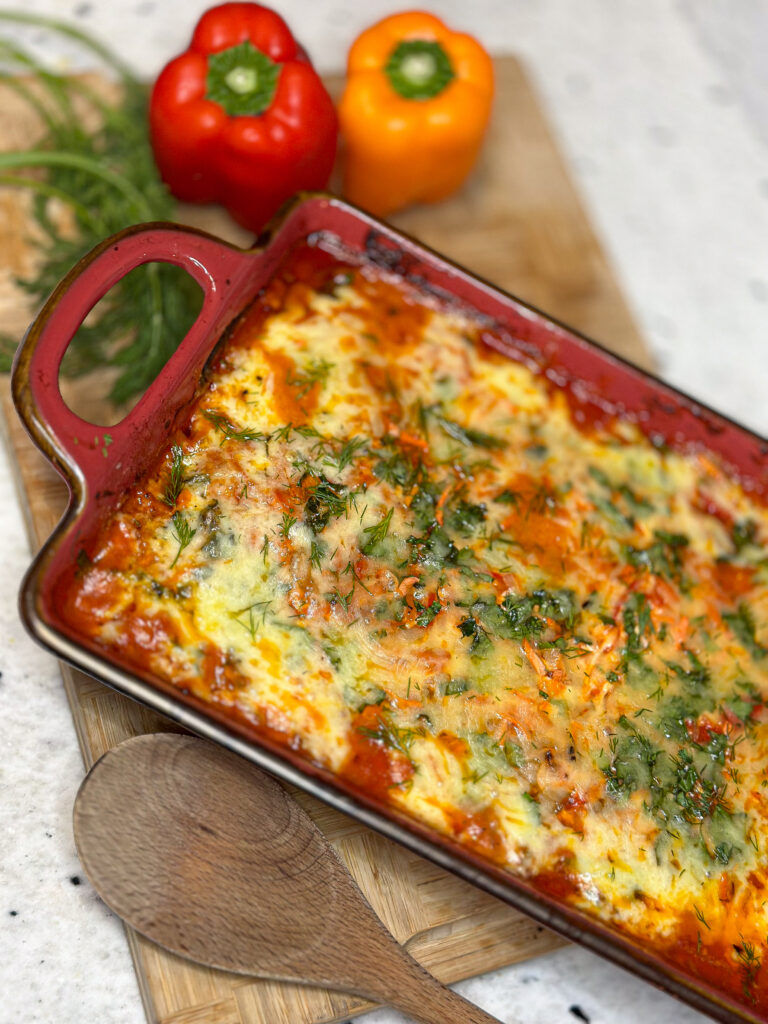
easy baked white fish with vegetables in a red casserole dish on a butcher block cutting board

If you liked this recipe, make sure to try these as well!

How to make baked white fish with vegetables ahead of time

You can do all the prep work, assemble the fish and vegetables in the baking dish, and store in the refrigerator until you’re ready to bake it. In that case, you must bake this dish for 40-50 minutes since the fish and vegetables will be cold.

EASY-BAKED WHITE FISH AND VEGETABLES

Whitefish is baked in between layers of nutrient-rich vegetables like onion, carrots, celery, peppers, tomatoes, and fresh herbs. The result is a flaky white fish that’s tender and flavorful.
5 from 1 vote
Prep Time 15 minutes
Cook Time 1 hour
Total Time 1 hour 15 minutes
Course Main Course
Servings 8 people

Equipment

  • deep casserole dish
  • Cutting board
  • Knife
  • large skillet

Ingredients
  

  • 2 1/2 lbs swai fish
  • 2-3 tbl oil (olive oil, ghee, grape seed, avocado)
  • 2 onions thinly sliced
  • 4 carrots grated
  • 3 celery sticks
  • 4 tomatoes- grated without skins (or 12 oz of tomato puree)
  • 1/2 cup milk
  • 3 large bell peppers (red bell pepper, yellow bell pepper, orange bell pepper)
  • 4  cloves of fresh garlic (pressed)
  • salt and pepper – to taste
  • Vegeta seasoning (optional)
  • 2 tbl mayonnaise- Greek yogurt or sourcream
  • 1/2 bunch  bunch chopped fresh parsley

Instructions
 

  • Cut the fish into four, then dry them with a paper towel to remove excess moisture. 
    Pour oil into a large nonstick skillet, just enough to cover the bottom (about a tablespoon). Place on medium-high heat to warm up.  Season the fish on both sides with salt and ground black pepper. Be light-handed with the salt on the fish. 
  • Peel and halve the onions then thinly slice them, julienne the bell peppers, and slice the celery into thin strips. Clean and grate the carrots as well as the tomatoes. The skin of the tomato should stay behind. ( or you can use crushed tomatoes from the can) Peel the garlic and then mince them using a garlic press.
  • Add another tablespoon of oil to the same skillet as you cooked the fish in, heat the skillet back to medium-high heat, then add the onions, carrots,  bell peppers, and celery to the skillet. Season with salt or Vegeta (about 1 tsp) and ground black pepper(1/4-1/2 tsp). Cook for 5-7 minutes, until the vegetables soften. Add the tomatoes, milk, and garlic. Give it a good mix, taste for seasonigs then season to taste if it needs more salt or vegeta. Cook for another 8-10 minutes.
    Turn the heat off, then add the freshly chopped parsley and dill. 
  • Preheat the oven to 350 degrees. 
  • Layer half of the fish in the bottom of the baking dish, then spread half of the vegetables over it. Spread one tablespoon of mayonnaise over the vegetables.  Then, layer the rest of the fish over the vegetables. Spread the remaining vegetables over the fish. Then, finish off with another tablespoon of mayonnaise. Sprinkle with some cheese. This is optional, but who doesn't love a little cheese? Am I right!? 😉
  • Cover the baking dish with either a lid or aluminum foil, then bake in the oven for 30 minutes or until the vegetables are soft and the fish is fully cooked. 
Keyword baked fish, fish, fish recipe, white fiish

Did you make this easy baked fish recipe?

Share a photo and tag us — we can’t wait to see what you’ve made! 

Let’s be friends! When you make our recipe, please leave a comment on this post. If you loved this recipe, we’d appreciate a 5-star rating! Sharing your experience, variations, and insights will help all our readers, and it helps us, too. If you’re on Pinterest feel free to leave a comment and photo there if you have one. If you share on INSTAGRAM tag @Lizasfarmhouse so we can stop by and give your post some love. 

Share:

Facebook
Twitter
Pinterest

Reader Interactions

Leave a Reply

Your email address will not be published. Required fields are marked *

Recipe Rating


Table of Contents

On Key

Related Posts

Sourdough Dinner Rolls

If you’re looking for a tried-and-true recipe for sourdough dinner rolls, you’re in the right place! These soft, fluffy sourdough rolls are perfect for family dinners, holiday gatherings, or as a comforting side to any meal. Made with an active sourdough starter, these rolls are naturally leavened, giving them a unique depth of flavor that only sourdough can provide. Let’s dive into how to make sourdough dinner rolls that will wow your friends and family! Make these sourdough Dinner Rolls for Thanksgiving! Thanksgiving is one of the best holidays to serve warm sourdough dinner rolls! Here are some meal ideas to add to your Thanksgiving table this year! Cheesy pull-apart sourdough bread, chicken sandwich melts, the best turkey soaked in a delicious brine, shepherd’s pie, creamy potatoes with green beans, Thai salad with peanut butter dressing, sugar snap peas salad, sourdough pumpkin cinnamon roll focaccia Here’s what you’ll need to make these fluffy sourdough dinner rolls:     •    Active Sourdough Starter: The key to that classic sourdough flavor.     •    Flour: All-purpose flour works great, but you can also use bread flour for a bit more structure.     •    Milk: Adds richness and softness to the rolls.     •    Butter: For flavor and a tender crumb.     •    Honey: Adds a touch of sweetness that balances the sourdough.     •    Salt: Enhances the overall flavor. Ingredients for sourdough dinner rolls:     •    100g active sourdough starter     •    300g warm milk (around 100°F)     •    50g honey or sugar     •    60g unsalted butter, softened     •    1 large egg     •    500g bread flour (or all-purpose flour for a lighter texture)     •    8g salt Instructions: Soft, Fluffy, and Easy to Make Start by feeding your sourdough starter several hours ahead to ensure it’s active and bubbly. You want it to be at peak activity for the best rise and flavor in your rolls.  Prepare Dough: Combine the warm milk and sugar in a large mixing bowl. Add the sourdough starter and stir until well-mixed. Then add the softened butter and egg, mixing until combined.   Mix Dry Ingredients: Add the flour and salt to the bowl with wet ingredients. Mix until a rough dough forms.  Knead: Knead the dough by hand or with a stand mixer for 8-10 minutes until smooth and elastic. It should be slightly sticky but manageable.  First Rise (Bulk Fermentation):  Cover the dough with a damp cloth or plastic wrap and let it rise in a warm place for 8-12 hours or until it has doubled in size. If you don’t have the correct timing and need to place the dough in the fridge, transfer the dough to the refrigerator for an overnight cold rise. Shape Rolls: After the first rise, punch down the dough and divide it into 12-16 equal pieces, depending on your desired roll size. Shape each piece into a ball and place them in a greased 9×13-inch baking dish, leaving a little space between each roll for expansion.  Second Rise: Cover the rolls and let them rise in a warm spot for another 2-3 hours or until they’ve puffed up and touched each other.  Bake: Preheat your oven to 375°F (190°C). Bake the rolls for 20-25 minutes, or until the tops are golden brown and the rolls sound hollow when tapped.  Brush with butter: As soon as the rolls come out of the oven, brush them with melted butter for extra softness and shine. You can also sprinkle some salt flakes, sesame seeds, or anything else your heart desires 🙂  Cool and Serve: Allow the rolls to cool slightly before serving. Enjoy them warm with honey! Tips for making perfect sourdough dinner rolls: Let me know how it turns out! Looking to expand your sourdough skills? I have a full collection of easy and tasty sourdough recipes waiting for you! Why You’ll Love This Sourdough Dinner Rolls Recipe These sourdough dinner rolls are:     •    Soft and Fluffy – Perfect for mopping up gravy or enjoying with butter.     •    Easy to Make – This simple recipe has straightforward steps that even beginners can follow.     •    Full of Flavor – The natural sourdough fermentation process brings a delicious tangy taste.     •    Perfect for Any Occasion – Great for weeknight dinners, holiday meals, or even as a snack! FAQs About Sourdough Dinner Rolls Can I Make These Sourdough Rolls Ahead of Time? Yes! You can make the dough the night before and let it rise slowly in the refrigerator. The next day, shape, rise, and bake the rolls. How Should I Store Leftover Rolls? Any leftover rolls can be stored in an airtight container at room temperature for up to 3 days or frozen for up to 3 months. Why Are My Sourdough Rolls Dense? Dense rolls usually mean your sourdough starter wasn’t active enough. Make sure your starter is bubbly and doubled before using. These soft sourdough dinner rolls are perfect for any meal, bringing a delicious homemade touch to the table. Whether you’re new to sourdough baking or a seasoned pro, this recipe will surely become a favorite. Give it a try and let me know how it turns out in the comments below! Happy baking!! Pin it for later!

Easy homemade sourdough bagels 

These easy homemade sourdough bagels are savory, chewy, crusty, and deliciously tangy. They are a fantastic way to start your morning or enjoy for a yummy brunch.  Quick and Easy Sourdough Bagel Recipe: No Cold Proofing Needed Are you craving delicious homemade sourdough bagels but don’t want to bulk ferment them overnight? This easy sourdough bagels recipe skips the cold-proof, meaning fresh bagels are ready the same day! Pin it for later! These easy homemade sourdough bagels are chewy, flavorful, and perfect for breakfast or lunch. In this recipe, we’ll cover everything you need to know, from ingredients and kneading to boiling and baking. Plus, I’ll share tips on how to get that authentic bagel texture and flavor. Why Make Sourdough Bagels at Home? Homemade sourdough bagels are not only more flavorful than store-bought, but they’re also free from preservatives. The sourdough starter adds a unique tang and chewiness to these bagels, giving them the perfect texture. This quick and easy method lets you skip the overnight proofing without sacrificing taste or texture. Ingredients for this Easy homemade Sourdough Bagels To get started with this quick sourdough bagel recipe, you’ll need:     •    500g (4 cups) King Arthur bread flour     •    125g (½ cup) active sourdough starter      •    250ml (1 cup) warm water (around 90°F or 32°C)     •    10g (2 tsp) salt     •    10g (2 tsp) honey or sugar (optional, for a hint of sweetness) Optional Toppings: Sesame seeds, poppy seeds, or everything bagel seasoning. To make easy homemade sourdough bagels, here are some essential tools to ensure the best results: Bakers schedule From start to finish, this recipe will take 7-9 hours. Here is the schedule I use. Use the proofing mat to cut down on time! Step-by-Step Guide: How to Make Easy Homemade Sourdough Bagels This recipe makes eight bagels, so I highly recommend doubling the recipe and freezing some! Freezing instructions are below. Mix the Ingredients First, combine the flour, water, active starter, honey, and salt in a large bowl. Then, knead the dough for 8-10 minutes until it becomes smooth and elastic. Use a stand mixer with a dough hook to make this process easier.   Tip: Kneading well ensures that your bagels have the right chewy texture! Stretch & Fold Then Rise Cover the bowl with a damp towel or plastic wrap and let the dough rise at room temperature for 30 minutes. Do three sets of stretch and folds, with 30 minutes in between each stretch and fold. Then, let the sourdough bagel dough rise for 3-6 hours or until it has visibly doubled in size. This quick sourdough bagel recipe is faster because it skips the overnight proof. For a quicker rise use a proofing matt. I set mine to 95-100F Shape the Bagels Once the dough has risen, divide it into 8 equal pieces. Cover a baking sheet with parchment paper. Roll each piece into a ball, line them up on the parchment paper, cover it, and let it rise for another 30 minutes to an hour or till they double in size. Use a proofing mat to make them rise faster! This is the one I use, and I love it! Flatten the circles just a little, then poke a hole in the center of the dough ball with your finger, gently stretching it to form a ring shape. Boil the Bagels Preheat your oven to 425°F (220°C). Bring a large pot of water to a boil, adding 1 tablespoon of baking soda and 1 tablespoon of brown sugar. Boil each bagel for 1 minute on each side. This boiling step is what gives sourdough bagels their iconic chewy crust. Bake the Bagels Place the boiled bagels back on the baking sheet and sprinkle with any desired toppings. Bake for 20-25 minutes, or until the bagels are golden brown. Cool them completely before slicing them open. Tips for the Best Sourdough Bagels With these tips, your homemade sourdough bagels will always come out perfectly! Enjoy experimenting with different toppings, flavors, and textures to make them uniquely yours. Let me know if you’d like even more variations!     1. Use a Strong Sourdough Starter: Make sure your starter is active and bubbly. This will give the bagels a better rise and deeper flavor.     2. Knead the Dough Well: Kneading is essential for that classic bagel chewiness, so don’t skip this step.     3. Boil for a Chewy Crust: The baking soda in the water helps create a golden, chewy crust. If you like a more intense crust, add a little honey or malt syrup to the boiling water     4. Experiment with Flavors: Beyond classic toppings, try mixing in ingredients like dried garlic, onion powder, or dried herbs directly into the dough for a flavor-packed bagel. Cinnamon raisin, jalapeño cheddar, and blueberry are also popular bagel variations!     5. Rest After Baking: Although it’s tempting to eat them immediately, let the bagels cool for about 15 minutes after baking. This helps the interior texture set and enhances flavor.     6. Storage Tips: If you’re not eating them all immediately, store bagels in a paper bag for up to 2 days at room temperature or freeze them for longer storage. Simply toast them straight from the freezer for a quick, fresh taste.     7. Make-Ahead Dough Option: If you want more flexibility, you can refrigerate the dough for up to 12 hours after the first rise. Let it come to room temperature for about an hour before shaping, boiling, and baking. Frequently Asked Questions 1. Can I skip the boiling step?     •    Boiling is what gives bagels their chewy texture and shiny crust. Skipping it would make the texture more like regular bread rather than an authentic bagel. 2. What toppings go best with sourdough bagels?     • Popular toppings include sesame seeds, poppy seeds, and everything bagel seasoning. You can also try minced

sourdough cinnamon pumpkin focaccia

Pumpkin season is here! And that means cue fall recipes 🙂 This sourdough cinnamon pumpkin focaccia bread makes the most delicious breakfast or dessert. It is flavored with pumpkin, cinnamon, and brown sugar! It has an irresistible crispy crust caramelized by butter and brown sugar, yet it is fluffy and airy inside with a hint of pumpkin. This makes it the perfect fall treat your whole family will love!  AS AN AMAZON ASSOCIATE, THIS POST MAY CONTAIN SOME AFFILIATE LINKS. THIS DOES NOT CHANGE YOUR PRICE. BUT IT DOES SHARE A SMALL COMMISSION WITH OUR FAMILY. READ THE FULL DISCLOSURE HERE Even though making sourdough cinnamon pumpkin focaccia may seem intimidating, it’s not hard to do. There are only about 20 minutes of actual hands-on work and most of the time; the bread is rising! I will walk you through achieving the perfect sourdough cinnamon pumpkin focaccia bread! Tools you will need to make sourdough focaccia bread Pin it for later! Ingredients for sourdough cinnamon pumpkin Foccacia Dough Toppings Cream cheese frosting Whip up a batch of dough the day before; the next day, it will be ready to bake for breakfast. While the bread is baking, your family’s mouths will water as the incredibly delicious cinnamon and brown sugar aroma circles through the house! To sum it up briefly, this recipe will make you look like a kitchen master with minimal effort on your part! While there is a long rise time, it’s almost entirely hands-off and the dough is as simple as tossing basic pantry staples into a bowl and stirring it all up. Baker’s schedule: The rise times will depend on how cold oe warm the environment is, the colder the house the slower the dough will ferment.  How to make sourdough cinnamon pumpkin Foccacia For this recipe, you will need a leavened sourdough starter. Read my other post about sourdough starters. I fed my sourdough starter at 3:00pm and by 6:00 p.m. it was ready for me to use! Once your sourdough starter is leavened ( risen), it’s time to mix the dough. To a large bowl, add 375 grams of warm filtered water, 100 grams leavened sourdough starter, 15 grams oil, 5 grams vanilla, 200 grams pumpkin puree, 45 grams sugar, 1/2 teaspoon ginger, 2 teaspoons cinnamon, and 2 tablespoons pumpkin pie spice. l. I use a food scale for accurate measurements. This is the one I have and love! It comes with a charger for easy charging. Mix all the ingredients using a dough whisk.  Then, add 600 grams of unbleached bread flour and 10 grams of fine sea salt. Mix the ingredients together to form a shaggy dough. Cover the bowl with either a shower cap or a tea towel. Recently, I started using shower caps to cover the bowls. It works so well! I just slip one over the bowl, and it stays in place. I bought a whole pack of them specifically for this, and I keep them in my proofing baskets for sourdough bread. Cover, then let the sourdough cinnamon pumpkin dough rest in a warm spot for 1 hour. Stretch and fold You will do three sets of stretch and folds, with 30-minute breaks in between. It will look like this: Strecth and folding will help to develop gluten which will create structure. It will also introduce air into the dough, resulting in those beautiful air bubbles focaccia bread is known for! Grab an edge and pull up, Be careful because focaccia dough has more water than regular sourdough bread. Sourdough focaccia bread is lighter, and it will rip much easier. Pull upwards as much as it would let you without ripping ( keep a damp hand  to prevent them from sticking to the dough). Fold it over to the middle. Turn the bowl and do the same till all sides are folded. Cover the bowl with saran wrap or a clean shower cap The next day: Iine a tall sheet pan with parchment paper and drizzled 1 tbl of olive oil over it. If you have a good nonstick sheet pan you don’t need to line it with parchment paper, just drizzle it with 1 tbl of olive oil. Let it rise! Once your dough is transferred into your baking vessel, gently spread the sourdough pumpkin dough to fit the pan. Try to be gentle; you don’t want to deflate it or rip it. Use your finger tips to spread it into all corners. Don’t dig your fingertips into the dough; you don’t want to disturb the bubbles inside. If the dough is too difficult to spread out, let it relax at room temperature for 20 minutes while covered with a towel, then continue. Once the sourdough cinnamon pumpkin focaccia dough is spread out, cover it with a tea towel and let it rise for 3-4 hours at room temperature. The dough will almost double in size and should have lots of bubbles on top. Pre-heat your oven to 450 F Toppings On top of the focaccia dough, drizzle 2 tablespoons of melted butter over the top of the dough, then evenly sprinkle 2 tablespoons of cinnamon and 1 cup of brown sugar. Make dimples To make dimples, simply place your finger tips into the well-fermented sourdough pumpkin focaccia dough until you reach the bottom of the pan. Do this all over the dough. Place the sourdough focaccia in the center rack of the oven and bake for 25 minutes or until the dough temperature hits 190 degrees F in the center or until the top is a light golden brown color. If the top is burning to much, place foil on top.  Let the sourdough cinnamon pumpkin focaccia cool for 10 minutes in the baking dish, then remove it and let it cool on a wire rack.  While the sourdough pumpkin focaccia is cooling, make the cream cheese icing. Combine the cream cheese, powdered sugar, and milk in a small bowl and whisk with a handheld mixer until smooth. Drizzle the cream cheese over the focaccia. I hope you love this recipe as much as we do! ​Other fall sourdough

Ukranian Banosh

Ukranian Banosh is corn porridge cooked in milk and sour cream and then topped with feta cheese, bacon, and mushrooms. This is a hearty and classic dish that most Slavic households have on a rotation for family dinners.  Growing up, my mom always made mamaliga, which is cornmeal. But my mother cooked it a little differently than how I make Ukrainian banosh; my mom made mamaliga using water for cooking it, and she made it thicker so that you could cut it into pieces. My neighbor Marina moved to America two years ago, and she shared how to make Ukranian banosh with me. My whole family fell in love with the concept of this dish! I love how there are so many different variants of mamaliga, and it changes slightly from family traditions.  Ukranian Banosh, sometimes called banush, is a type of porridge made from cornmeal, cream or milk, and sour cream. It is a staple in the cuisine of the Hutsuls, a Slavic ethnic group residing in Western Ukraine. Banosh is typically served with feta (sheep’s cheese) and bacon, making it irresistible when it hits the table. The whole family loves this dish, including little kids!  AS AN AMAZON ASSOCIATE, THIS POST MAY CONTAIN AFFILIATE LINKS. THIS WILL NOT CHANGE YOUR PRICE, BUT IT WILL SHARE A SMALL COMMISSION WITH OUR FAMILY. Cornmeal (mamaliga): Toppings: The main components of banosh is cornmeal porridge with feta cheese. From there you can add whatever your heart desires! Alter the toppings to your family’s liking.  Garlic sauce Garnish Recipe Tips and Substitutions Before you make this recipe for Ukrainian Banosh, read through these tips and tricks to know what to expect and what to substitute if you get stuck! Pin it for later! Ukrainian Banosh Recipe Preparing your toppings will take the longest, as the cornmeal only takes a few minutes to cook. Dice the bacon into small pieces and cook it in a large skillet until it is cooked. Remove the bacon but leave the fat in the skillet.  Dice one large onion and saute it in the bacon fat. Once the onions are golden brown, add sliced mushrooms and a pinch of salt to taste. Continue to saute the onions and mushrooms for 2-3 minutes or until the mushrooms are soft. Shred the mozzarella cheese and dice the tomatoes. I prefer to use cherry tomatoes as they don’t become soggy.  Place a large pot over medium-high heat. Add the milk, water, and salt, then bring to a low simmer. While whisking the liquids, slowly pour in the cornmeal in a thin stream; do not stop stirring to avoid clumps to have a smooth porridge. Turn the heat down to low and keep stirring for 90 seconds. Turn the heat off. Switch to a wooden spoon, then add the butter and the sour cream, mixing until you have a smooth and creamy texture. Pour the cornmeal into a large dish of your choice, add the cheeses first, then the rest of the toppings. Let a few droplets of oil from the bacon go on top of the cornmeal for extra flavor. Garnish with fresh dill, garlic sauce, and a few extra dollops of sour cream.  This makes a perfect side dish to accompany any grilled meat, or it can be a full meal on its own! Enjoy it while it’s hot!  More easy dinner recipes you will love!