

Baking a loaf of sourdough bread is pure therapy. Not only will it fill your kitchen with delicious smells of yeasty goodness, but you’ll also walk away with a handful of life lessons and a piece of unbelievably fulfilling bread. This crusty no-knead bread will become something you bake for your family weekly! This sourdough bread is baked in a Dutch oven to develop a crispy, golden crust, and the inside has a fluffy and perfectly tangy crumb.

As an Amazon Associate, this post may contain affiliate links. This will not change your price but will share some commission with our family.
The second I saw pictures floating around all over Instagram, I knew right away that I had to learn how to bake sourdough bread! I have tried many different recipes I have found for sourdough bread online. Now they weren’t all terrible, but I was on the hunt to find THE perfect recipe! And I finally found one! This recipe paired with this technique gives the loaf a golden crunchy crust, and the inside has an irresistibly soft and tangy crumb.
An Instagram friend shared this recipe with me, and with her permission, I am posting this recipe for all of you to make! A huge thank you to Luda Drigailo head over to her Instagram for more delicious sourdough recipes and simple living.
Our love for sourdough has begun!
Baking sourdough bread has become a staple in our household. This bread is made at least four times a week at our house. My kids always ask me to bake this delightful bread. We use it to pair with soups and sandwiches, and my kids love it the most – with butter and jam while it is still warm from the oven.
I’ve been getting an excellent consistent rise and bake with this recipe, so I knew I had to share this recipe with you all! There is something magical about mixing the dough from scratch to bake for your children. When I put the loaf of sourdough bread into the oven, and the house fills with a beautiful aroma of bread baking, all our children rush into the kitchen with excitement!

When I am mixing and folding sourdough bread, I imagine the generations of mothers before me creating bread to feed their own children. There is something special in making homemade fresh sourdough bread with my hands for my loved ones!
What is sourdough?
To better understand what sourdough is, let’s talk about yeast. Yeast is a fungus, and it’s all around us. It floats through the air, it’s living in our bodies, and it’s in a lot of the food that we eat. Traditionally, bread is made in two different forms: commercially made yeast or with a sourdough starter. You are most likely familiar with commercially produced yeast, which is sold dry. It’s cultivated in a lab to work fast to leaven (rise) our bread specifically.
Is sourdough healthier than yeast?
Now that we understand what yeast is, let’s dive into what is sourdough? and why it is healthier than yeast. The sourdough starter consists of 3 things. Flour, water, and organisms. Sourdough bread is made by fermentation, and it’s naturally leavened bread, which means it doesn’t use commercial yeast to rise. Instead, it uses a ‘starter’ – a fermented flour and water mixture that contains wild yeast and good bacteria – to rise.
This produces the tangy flavor and slightly chewy texture you’ll find in sourdough. Wild yeast has more flavor than commercial yeast. Sourdough is natural in the sense that it doesn’t contain any additives, and it also helps to break down the anti-nutrients for better absorption.

Benefits of sourdough bread
Since sourdough bread is processed through fermentation, that means it has probiotics as well. As a result, it becomes more digestible and provides fiber. This will bring benefits to the body, such as improving digestion and promoting a healthy gut.
This recipe is based on you having an active starter that you have fed a few hours before starting your bake.
Bread making tools
Sourdough bread has been made for thousands of years without any modern tools. However, some equipment is available to make this process a little easier.
- Food scale- There is one tool that, in my opinion, is necessary, and that’s a food weight scale. When it comes to baking sourdough bread, precision is key! There’s no better way to measure accuracy than using a digital food scale.
- Banneton- Proofing baskets and a scoring tool are excellent to have but are not necessary.
- Jar- A good jar to grow your sourdough starter is also important!
- Dutch oven- Last but not least, you will need a Dutch oven. A Dutch oven helps the bread to get the delicious crunchy crust that sourdough bread is famous for. Without a Dutch oven, it will be hard to achieve this. Ok! Now that you have all your tools let’s start to bake!
What you will need to bake sourdough bread
Sourdough bread consists of a few basic ingredients you already have in your pantry! flour, water, salt, and LEAVENED sourdough starter. First of all you will need a good sourdough starter. As I already talked about this previously, a starter is your rising component in bread making. Without this, your bread will NOT rise.
Ingredients:
- 1,000 grams of bread Flour
- 650 grams of filtered water
- 20 grams salt
- 200 grams active sourdough starter (fed in the last 12 hours)
You can use any flour for this recipe. Although different flours might give you a different outcome, never the less it will still turn out delicious! I’ve used many flours in the past, I usually use what I have on hand at that moment. I have used all-purpose flour, a really good and healthier option is einkorn flour or unbleached organic all-purpose bread flour.
Make sure to use barely warm filtered water for this recipe. It is very important that your water is filtered. The reason for that is that most tap water has chlorine traces. Chlorine may cause the active sourdough starter to weaken, and if used periodically, over time, it may kill your sourdough starter.
I prefer to use natural salt for this bread (pink Himalayan or sea salt). Try to void using iodized table salt.
The most important component in this recipe is the sourdough starter! In order to make a delicious loaf of sourdough bread, you need to use an active starter that has been fed within 4-12 hours before use.
PRO TIPS:
These tips I bring to you after some trial and error, I made the mistakes so you don’t have to!
- First- the most essential tip is to make sure to use an active sourdough starter (bubbly). If you are not using a starter you fed 4-12 hours prior, This will not work. It’s best to use a starter while it is at its peak! (meaning, feed your starter water and flour. Give it a good mix, then leave it on your countertop until it doubles in size)
- Pay attention to your sourdough in-between each stretch and fold. If it looks like it isn’t fermenting, with no visible bubbles in the dough, let it sit at room temperature a little longer before you do your next stretch and fold.
- Do not dissolve salt, water, and the sourdough starter at the same time before you add the flour. When the salt and the sourdough starter hit the water simultaneously, the sourdough turns into a rubbery consistency that doesn’t dissolve.
- My second tip is don’t mix your sourdough starter with too much water. When your sourdough starter has too much water, the starter will become foamy on top and might not get the best rise. I have baked with it in the past anyway, and it makes your bread flatter than usual. A good ratio for a sourdough starter would be, 50g sourdough starter, 200g water, and 200g flour.
Is your sourdough bread burning from the bottom when baked?
- Placing something between your Dutch oven and the base of your oven can lower the heat transfer underneath. Try leaving a sheet pan on the lower rack than the Dutch oven.
- Another trick to prevent sourdough bread from burning is, cut out a silicone mat to fit your Dutch oven. And place it on the bottom of the Dutch.
This recipe makes two loafs
If you only need one loaf, you can cut this recipe in half. Trust me when I say “you will want to make two loafs” I often find myself doubling this recipe. You can bake one loaf one day and leave your other loaf in the fridge unbaked for up to two weeks. The longer it stays in the fridge the better it gets! The phrase “It gets better with age” applies to sourdough as well.
How to make sourdough bread
In a large bowl add 1,000 grams of flour, 200 grams of active sourdough starter, 650 grams of warm filtered water, and 20 grams of salt. For the next part I like to use the best tool there is, my hands! wash your hands and give this a good mix. You don’t want to knead the dough, you want to combine all the ingredients together till there is no dry streaks of flour. The dough will be very sticky, you might be tempted to add more flour. But trust the process! do not add more flour than what the recipe is asking for.

After a good mix, close the bowl with a lid and let the sourdough bread mixture rest for 1 hour. For this step, you can cover the dough with saran wrap, a tea towel, or a lid. You don’t want a tight seal on the sourdough. You still want some air to circulate into the dough, to help ferment it. Yet you don’t want the dough to develop a hard crust either.

I would recommend keeping a cup with water next to the bowl, this will be used to dip your fingers to get them wet, to help the sourdough from sticking to your hands while you are doing the next step.
Now, you will stretch and fold the sourdough. Gluten relaxes over time, this step will help to build up the gluten and give it strength and shape. Which will result in a beautiful rise when baking.

Place your hands under the sourdough, and with both hands stretch the sourdough up as far as it will let you. Be gentle not to rip the dough, then fold it over to the middle of the bowl. repeat this process on all sides. Once you have stretched and folded all sides of the sourdough, cover it with the lid and let rest for 45 minutes.
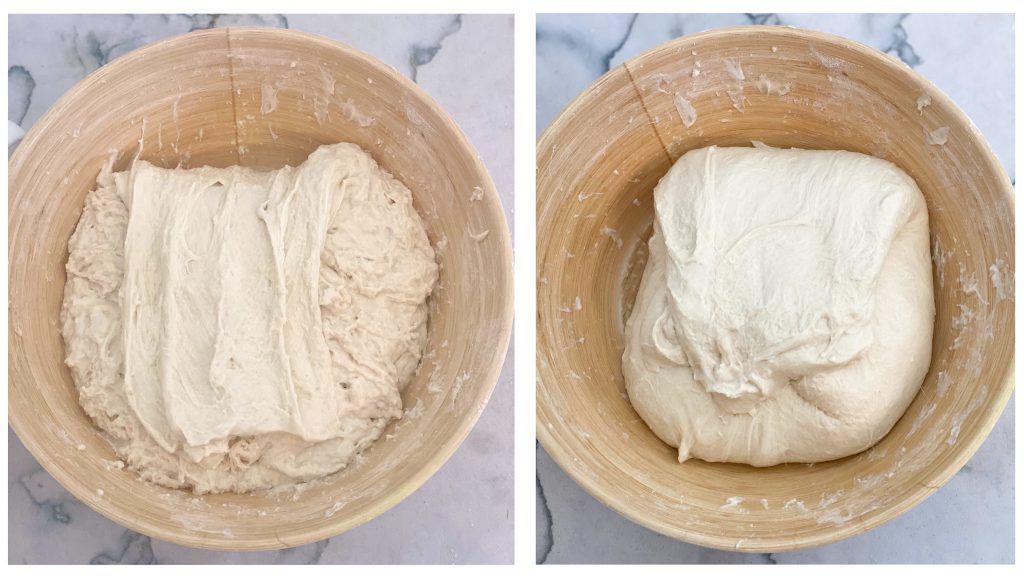
Repeat this process 3 times.
After 3 stretches, gently take out the sourdough on a clean countertop. Do not dust any flour on the countertop. Once the dough is out of the bowl, take a bench scraper and divide the dough into two equal pieces. Once it is divided- cover the dough with a tea towel and let it rest for 10 minutes. This step will ensure that your dough relaxes, then it will be easier to stretch it for the next step.
After letting the dough rest for 10 minutes you will work with one loaf at a time. Take your first dough and with your hands stretch the sourdough out on a clean countertop. You will NOT need to wet your hands for this step. it will be a little sticky, but make sure to not add any additional flour. if the sourdough is too sticky to work with use your bench scraper to help.
Next, take one side of the sourdough and fold it over to the center, then fold over the opposite side.
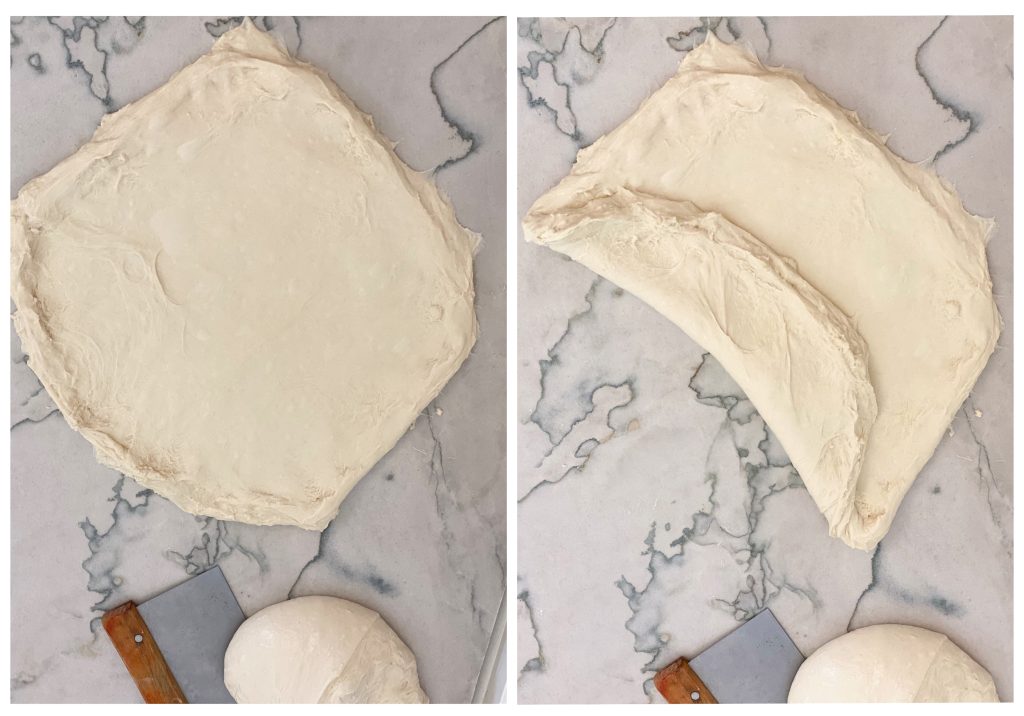
Once the two sides are folded, roll the dough into a ball. then seal the ends. Tuck the ends underneath the dough to form a ball. After the sourdough is formed into a ball start to twist the dough on the table to create tension on the bottom of it. This helps to close up any open holes. Repeat the same process on the other dough.

Now that your sourdough is shaped into a ball- lightly flour your proofing basket (if you are not using proofing baskets then take a bowl and line it with a tea towel) flip your sourdough with the bottom facing up into your basket or bowl. Pinch to seal any holes. Dust the Sourdough ball with a little bit of flour, then cover it with saran wrap and a lid. Or place it inside a plastic bag if you don’t have a lid that fits the bowl, then tie the bag so air doesn’t get inside. Place in the fridge for overnight fermentation. Repeat the same process for the other loaf.
An unbaked loaf can proof in the fridge for a week. The longer it ferments in the fridge the more “sourdough” flavor will come through.

Time to bake your sourdough bread
This is the most exciting part! it’s baking day!
Place a Dutch oven into the oven with the lid closed and preheat the oven to 500F. While your oven is preheating (with the Dutch oven inside) take your loaf out of the fridge and gently flip your dough onto parchment paper.

This is the time to score your bread! When the sourdough bread is baking in the oven it rises to almost double its size, and if you don’t score it you will have random cracks throughout the loaf. Scoring gives you control over where you want the bread to expand. Also, you can make it look pretty, have fun with it!
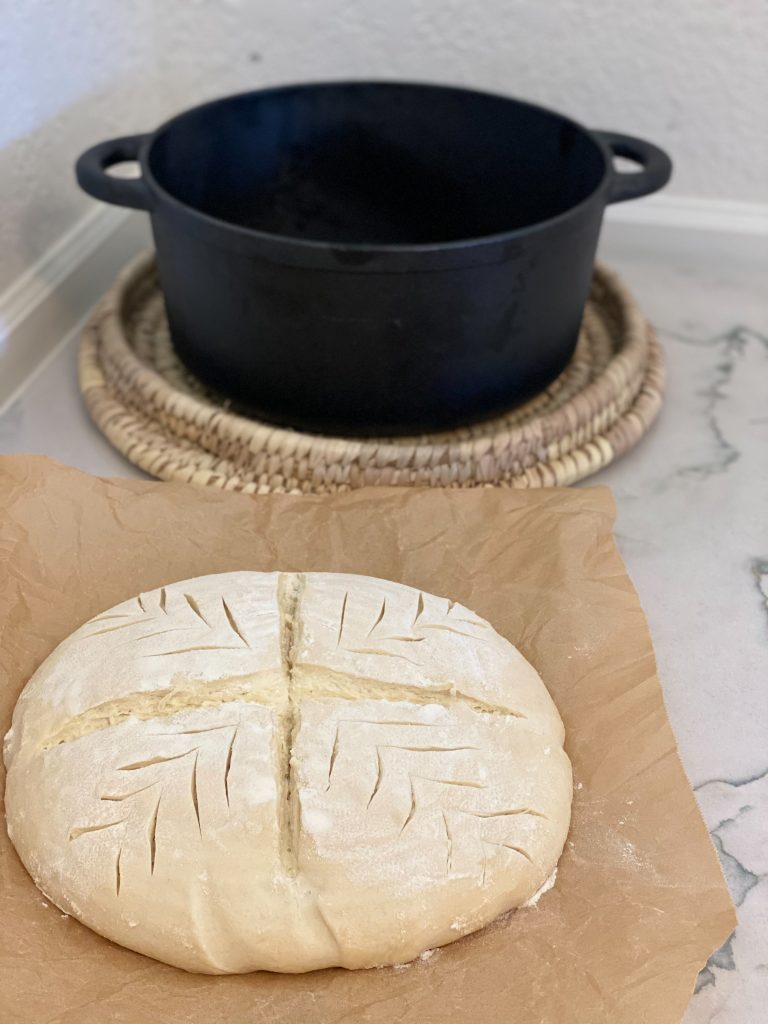
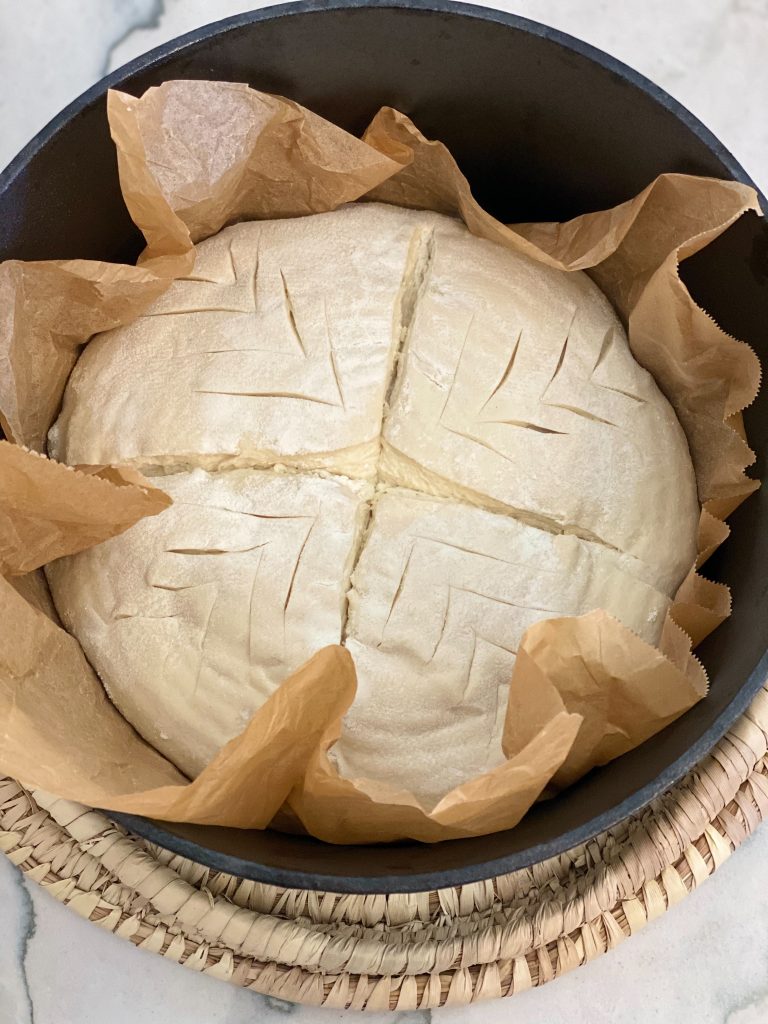
Take out the Dutch oven from the oven, be careful a preheated Dutch is very hot! use oven mitts for your safety. Place the sourdough bread into the Dutch oven with the parchment paper, and bake for 30 minutes at 500F with the lid closed on the Dutch oven. After 30 minutes remove the lid from the Dutch oven and lower your heat to 450F and bake an additional 3-10 minutes depending on how much color you want on your sourdough bread.
Our sweet spot is at 3 minutes. Take out your sourdough bread from the oven, and place it on a cooling rack for two hours before you slice into it. I know it’s tempting, but it is worth the wait. Most of the time we are impatient and cut into it right away and end up waiting anyways because it’s way too hot to eat.
Enjoy! I hope your household will become as obsessed as we are with sourdough bread!

Leave a comment down below! Let me know if you loved this post!

Sourdough Bread
Equipment
- 2 Proofing basket or 2 medium bowls
- Food scale
- 1 Large bowl
- Parchment paper
- Dutch oven
- Scoring tool or a razor
Ingredients
- 1000 grams Bread flour
- 650 grams Filtered water
- 200 grams Active (leavened) sourdough starter
- 20 grams salt
Instructions
- Autolyse:In a large bowl weigh out 1,000 grams of flour, 200 grams of active sourdough starter, 650 grams of warm filtered water, and 20 grams of salt. Wash your hands and give this a good mix. You don’t want to knead the dough, you just want to combine all the ingredients together so there are no dry streaks of flour. The dough will be very sticky, you might be tempted to add more flour. But trust the process! do not add more flour than what the recipe is asking for
- close the bowl with a lid and let the sourdough bread mixture rest for 1 hour. You don’t want a tight seal on the sourdough. You still want some air to circulate into the dough, to help ferment it. Yet you don’t want the dough to develop a hard crust either.
- Stretch & Fold:Place your hands under the sourdough, and with both hands stretch the sourdough up as far as it will let you. Be gentle not to rip the dough, then fold it over to the middle of the bowl. repeat this process on all sides. Once you have stretched and folded all sides of the sourdough, cover with the lid and let rest for 45 minutes. Repeat steps 2 & 3, three times.
- After 3 stretch and folds gently take out the sourdough on a clean counter top. Make sure not to dust any flour on the counter top. Once the dough is out of the bowl, take a bench scraper and divide the dough into two equal pieces.
- Once its divided- cover the dough with a tea towel and let it rest for 10 minutes. This step will ensure that your dough relaxes so its easier to work with.
- Shaping Your Dough:Take your first dough and with your hands stretch the sourdough out on a clean counter top into a circle It will be a little sticky, but make sure to not add any additional flour. if the sourdough is too sticky to work with use your bench scraper to help.
- Take one side of the sourdough and fold it over to the center, then fold over the opposite side.
- Once the two sides are folded, roll the dough into a ball. then seal the ends. Tuck the ends underneath the dough to form a ball.
- After the sourdough is formed into a ball start to twist the dough on the table to create tension on the bottom of it. This helps to close up any open holes. Repeat the same process on the other dough.
- Now that your sourdough is shaped into a ball- lightly flour your proofing basket.
- flip your sourdough with the bottom facing up into your basket or bowl. Pinch to seal any holes. Dust the Sourdough ball with a little bit of flour.
- Cover with saran wrap and place a tight lid on top, so air cant get inside. Repeat the same process for the other loaf.
- Cold Ferment:Place in the fridge for an overnight fermentation, or at least 12 hours.
- Preparing to Bake:Place a Dutch oven into the oven with the lid closed and preheat the oven to 500F
- Take your loaf out of the fridge and gently flip your dough onto parchment paper.
- Score the sourdough loaf using a sharp razor. Make one big score down the middle, leaving 1 inch of boarder on both sides. (top to bottom)
- Baking Your Sourdough:Take out the Dutch oven from the oven, Place the sourdough bread into the Dutch oven with the parchment paper, close the lid.
- Put the Dutch oven back into the oven, Bake for 30 minutes at 500F
- After 30 minutes remove the lid from the Dutch oven and lower your heat to 450F and bake an additional 3-10 minutes depending on how much color you want on your sourdough bread.
- Take out your sourdough bread from the oven, and place it on a cooling rack for 2 hours before you slice into it.
Notes
- This recipe is based on you having an active starter that you have fed a few hours before starting your bake.
- If you’re worried about the bottom of your bread burning, place a baking sheet on shelf underneath your Dutch Oven, Placing something between your Dutch oven and the base of your oven can lower the heat transfer underneath.
- This recipe makes two loafs, you can cut the recipe in half for one loaf
Pin it for later!


Reader Interactions