
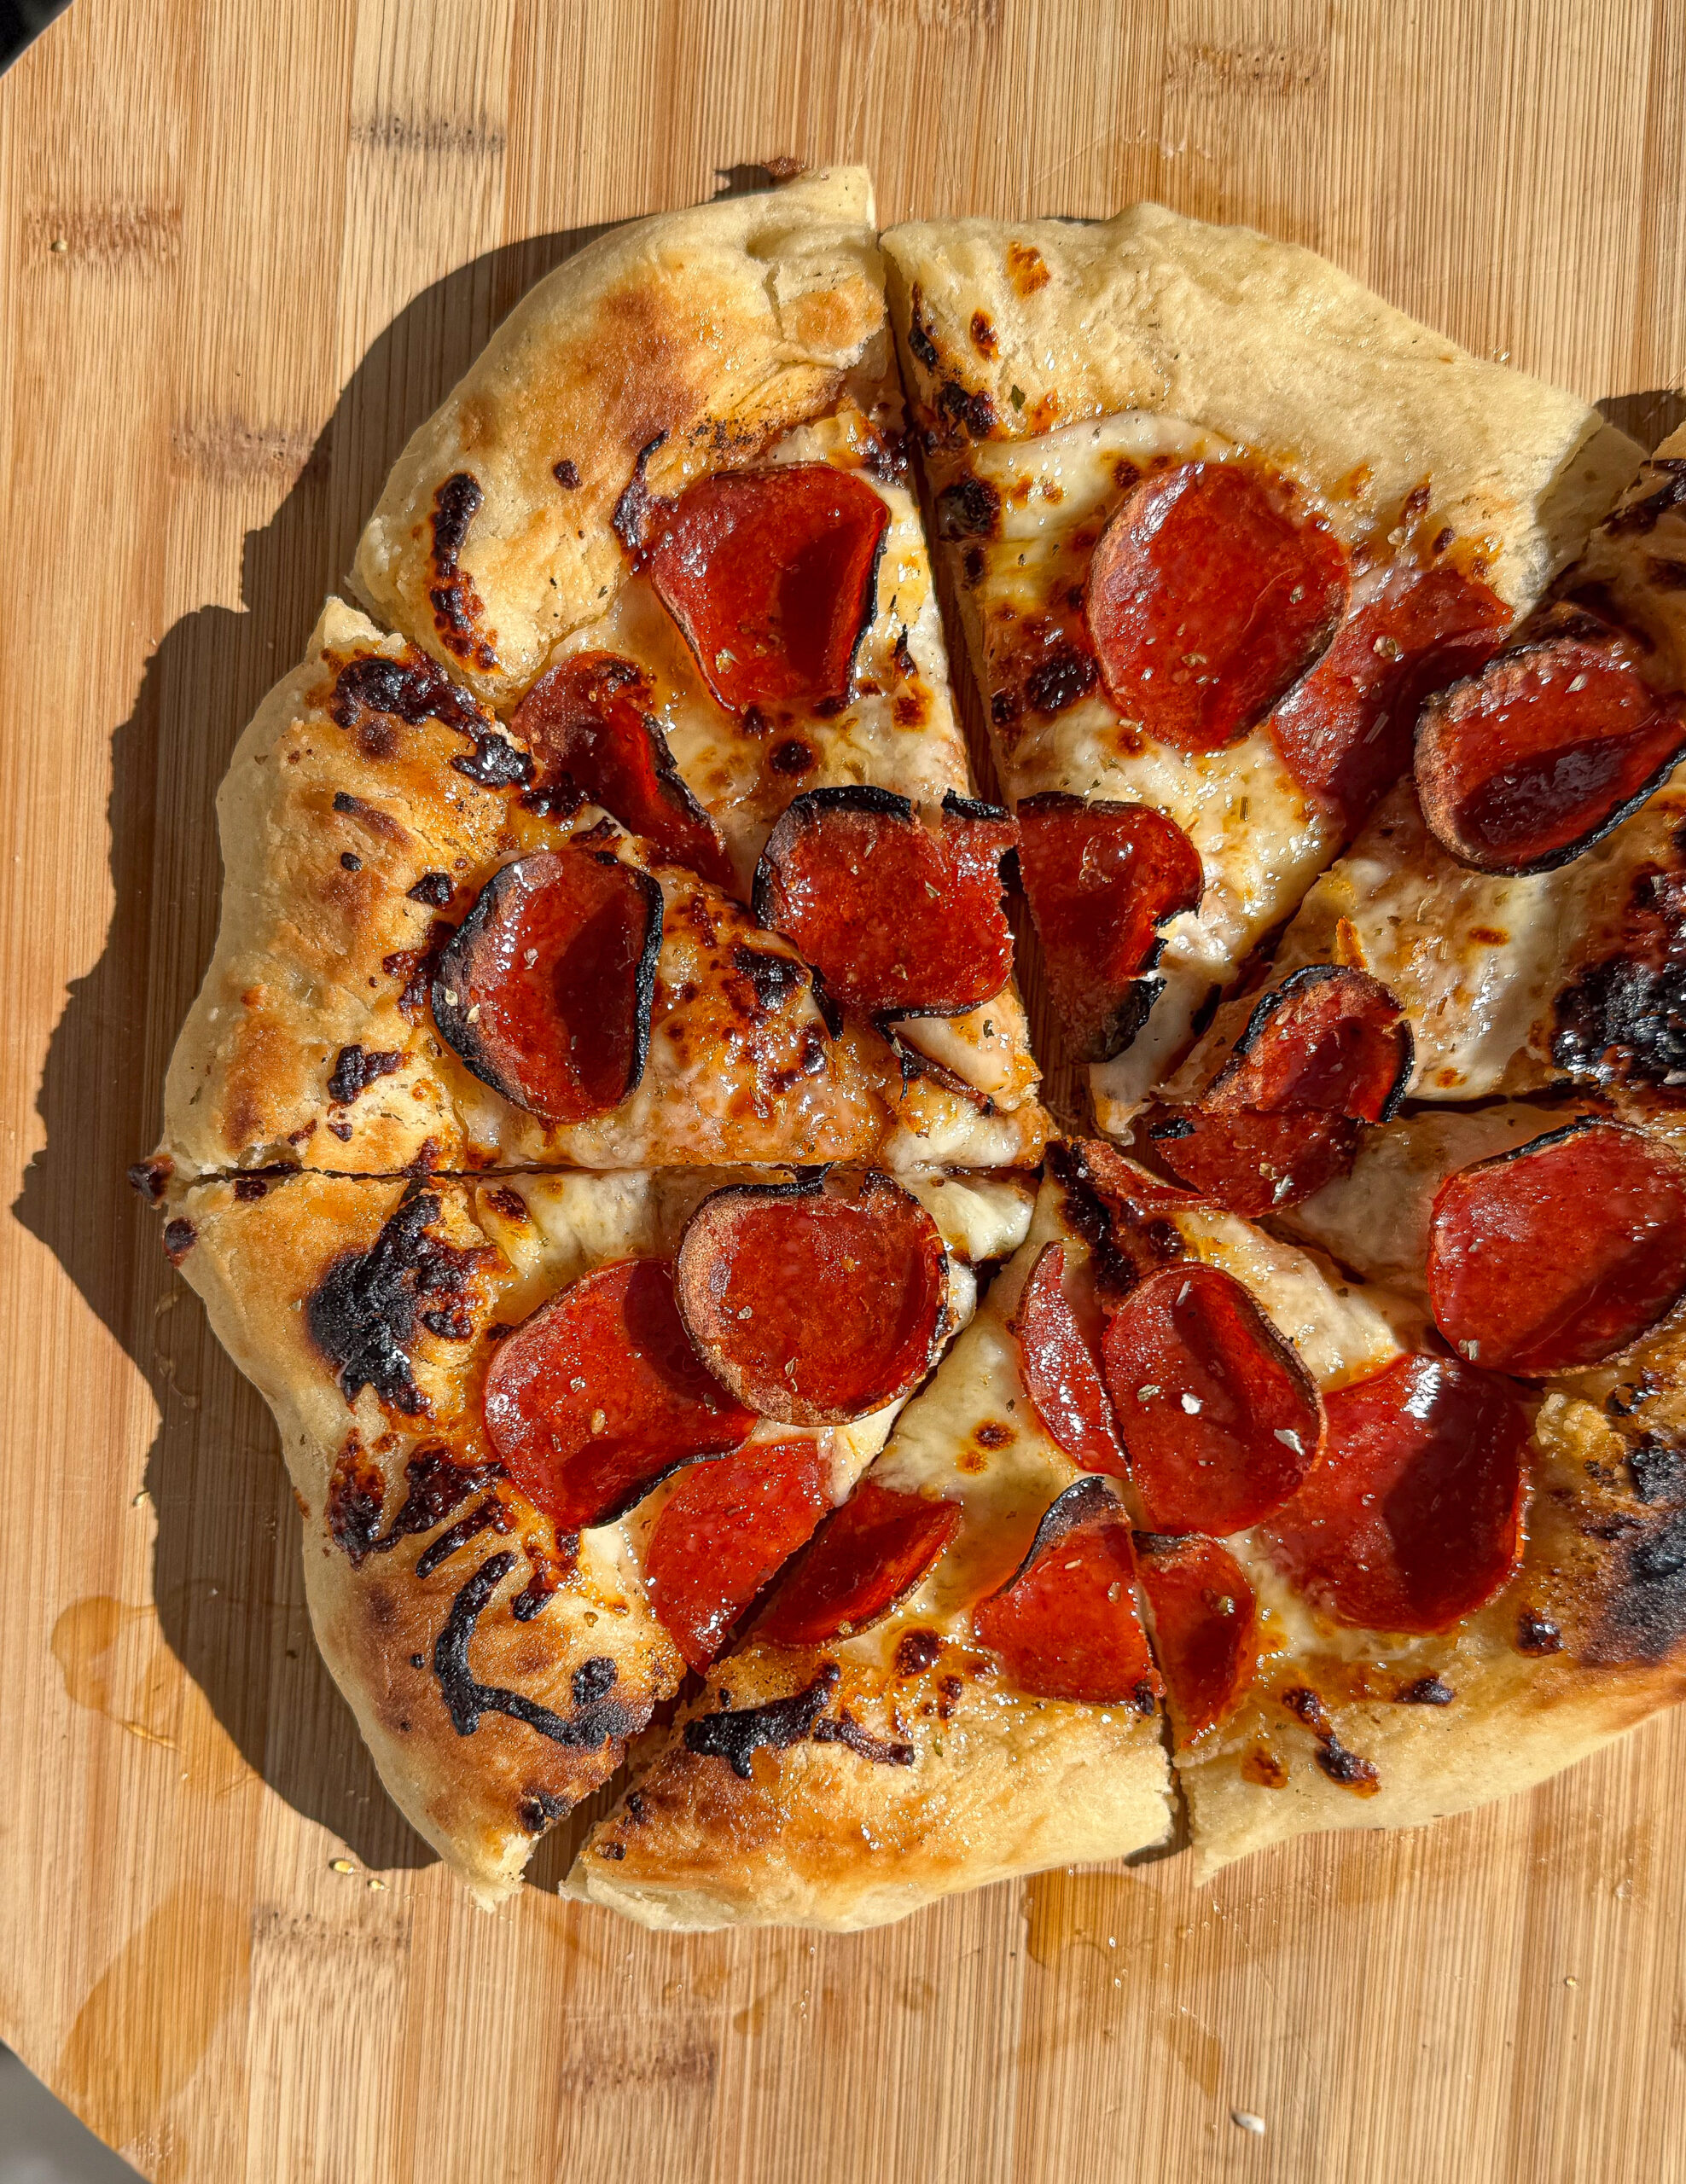
This easy sourdough pizza crust is perfectly crispy on the outside, soft and airy on the inside, and packed with that signature tangy flavor only natural fermentation can provide. Whether you’re a seasoned sourdough baker or just starting out, this recipe is simple to follow and incredibly rewarding.
")
There’s nothing quite like homemade pizza, and when you introduce sourdough into the mix, you take it to a whole new level. If you ever have sourdough pizza crust, you will never want to go back to normal pizza. In fact, once you try sourdough pizza, you will never be able to enjoy regular pizza again!
Why Sourdough for Pizza?
Using a sourdough starter instead of commercial yeast not only enhances the flavor but also makes the crust easier to digest. The natural fermentation process breaks down gluten and phytic acid, making the nutrients in the flour more bioavailable. Plus, the depth of flavor is unmatched!
")
While recipe testing this pizza crust, I made pizza every day for a whole week! By the end of it, my family was so tired of pizza. Later that month, my husband ordered Domino’s for a quick dinner… let’s say my family was begging me to make more of my sourdough pizza. 😉 I love using my Piezano pizza oven from Amazon—it makes a world of a difference! The high heat creates that perfect pizzeria-style crust that’s impossible to replicate in a standard oven.
Tools you will need to make easy sourdough pizza crust:
- Pizza oven, baking steel, pizza stone, or a cast iron skillet
- kitchen scale
- large mixing bowl
Ingredients:
- 100g active sourdough starter- You can also use sourdough discard
- 350g warm filtered water
- 10g fine sea salt
- 30g olive oil
- 500g all-purpose flour- avoid bread flour for a light and chewy crust.
Pin it for later!

AS AN AMAZON ASSOCIATE, THIS POST MAY CONTAIN AFFILIATE LINKS. THIS WILL NOT CHANGE YOUR PRICE, BUT WE WILL SHARE A SMALL COMMISSION WITH OUR FAMILY.
Sourdough pizza recipe
The Night Before: Mix and Ferment
Grab a large mixing bowl—bigger than you think you’ll need because this dough is going to rise! Add all the ingredients and mix by hand until everything is incorporated. It’s going to be a soft and slightly wet dough at first, but don’t worry—it will come together beautifully. Cover the bowl with a clean towel or a shower cap and let it sit at room temperature overnight. This bulk fermentation is where the magic happens!
The Next Morning: Strengthen the Dough
Now that your dough has had time to develop, it’s time to build strength. Wet your hands with a bit of water so the dough doesn’t stick, then perform a set of stretch and folds. Picture this: gently grab one side of the dough, stretch it up, then fold it over onto itself. Rotate the bowl and repeat this on all four sides until you’ve gone full circle. This helps create structure and those beautiful air pockets we love in a great pizza crust.
")
Once you’ve completed your stretch and folds, cover the bowl again and pop it in the fridge for up to 36 hours. This step is optional, but if you have the time, it deepens the flavor and makes the dough even easier to work with.
Preparing to Bake
When you’re ready to make your pizzas, remove the dough from the fridge and let it rest at room temperature for about 30 minutes—just enough to take the chill off and make it easier to work with. While the dough is resting, generously flour your work surface to prevent sticking. Using a bench scraper, divide the dough into four equal portions and gently shape each piece into a smooth dough ball. Cover the dough balls with a clean tea towel and allow them to rest for another 30 minutes. This final resting period helps the gluten relax, making it much easier to stretch the dough into a thin, even crust without tearing.
Cooking the Pizza
This makes the perfect individual pizzas!
For Piezano Pizza Oven: Preheat your Piezano pizza oven to 800°F. While the oven heats, take one of your dough balls and begin shaping it into an 8-inch circle on a well-floured surface. Start by gently pressing from the center outward, stretching the dough with your hands. If it resists and shrinks back, let it rest for another 15 minutes to relax the gluten, then continue shaping until you reach your desired size.
")
Once your dough is shaped, place it onto a wooden paddle and poke holes in the crust using a fork. Drizzle some extra virgin olive oil and use a brush to evenly distribute it over the crust. Add your sauce (I highly recommend our homemade marinara sauce) and toppings while the dough is on the paddle. Use the paddle to carefully transfer the pizza into the Piezano pizza oven. Cook for about 5-6 minutes until the bottom is golden brown with slight charring.
")
For Conventional Oven: Turn on your oven’s broiler and place a cast iron skillet or a pizza stone inside to preheat. You want that skillet to be hot—this is key to getting a perfectly charred crust.
While the skillet heats, take one of your dough balls and shape it into an 8-inch circle on a well-floured surface. Once the skillet is ready, carefully lay the stretched-out dough onto the hot skillet and poke holes in the crust with a fork. Drizzle some extra virgin olive oil and use a brush to distribute it evenly over the crust, then immediately add your sauce and toppings. Keep it simple so the crust remains the star—think fresh mozzarella, basil, and a drizzle of olive oil. Cook for about 5-9 minutes until the bottom is golden brown with slight charring. Keep an eye on it. Once the cheese is melted and bubbly, and the crust looks beautifully crisp, it’s ready to come out. Let it cool for just a few minutes before slicing in—you don’t want to burn your mouth, but you also don’t want to wait too long!
")
Best Tips For Sourdough Pizza Crust:
- Use a mature starter: Your sourdough starter should be bubbly and active for the best rise.
- Cold fermentation for enhanced flavor: If you have time, letting the dough sit in the fridge for 12-24 hours will develop a richer taste.
- High heat is key: A hot oven ensures a crispy crust, so don’t skimp on preheating.
- Less is more with toppings: Too many toppings can weigh the dough down and make it soggy—keep it light and fresh!
This sourdough pizza crust is a game-changer, bringing artisanal quality right to your home kitchen. It’s a little bit of a process, but totally worth it. Try it out, have fun with your toppings, and enjoy the best homemade pizza you’ve ever had!
Topping Ideas:
Looking to switch up your pizza game? Here are some delicious topping ideas to try:
- Classic Margherita: Fresh mozzarella, basil, a drizzle of olive oil and balsamic glaze
- Pepperoni Lover’s: homamde tomato sauce,Spicy pepperoni, shredded mozzarella, Mike’s hot honey, and a sprinkle of oregano.
- Veggie Delight: Bell peppers, mushrooms, onions, and olives.
- BBQ Chicken: Shredded chicken, barbecue sauce, red onion, and cilantro.
- White Pizza: Ricotta, mozzarella cheese, garlic, and spinach.
- Pesto Perfection: Pesto sauce, cherry tomatoes, mozzarella, and pine nuts.
- Breakfast Pizza: Scrambled eggs, bacon, cheddar cheese, and green onions.
- Sweet & Savory: Prosciutto, arugula, goat cheese, and a drizzle of honey.
Get creative with your toppings and customize each pizza to your liking!
Tag me on my social accounts so I can see your creation!
FACEBOOK | INSTAGRAM | TIKTOK |
")
Make-Ahead and Freezing Instructions:
Want to prep your dough ahead of time? Here’s how:
- Refrigeration: Once the dough has been mixed and fermented overnight, you can store it in the fridge for up to 3 days. Just make sure it’s in an airtight container or covered with plastic wrap to prevent it from drying out.
- Freezing the Dough: After dividing the dough into portions, lightly coat each ball with olive oil, place them in individual freezer bags, and freeze for up to 3 months. When ready to use, thaw in the fridge overnight and bring to room temperature before shaping.
- Par-Baking the Crust: If you want to save time on pizza night, you can partially bake the crust. Roll out the dough, bake at 450°F for 5-7 minutes until lightly golden, then cool completely. Wrap tightly and freeze. When ready to use, add toppings and bake until fully cooked.
Tips for the Best Sourdough Pizza Crust:
- Use a mature starter: Your sourdough starter should be bubbly and active for the best rise.
- Cold fermentation for enhanced flavor: If you have time, letting the dough sit in the fridge for 12-24 hours will develop a richer taste.
- High heat is key: A hot oven ensures a crispy crust, so don’t skimp on preheating.
- Less is more with toppings: Too many toppings can weigh the dough down and make it soggy—keep it light and fresh!
This sourdough pizza crust is a game-changer, bringing artisanal quality right to your home kitchen. It’s a little bit of a process, but totally worth it. Try it out, have fun with your toppings, and enjoy the best homemade pizza you’ve ever had!
Sourdough Pizza Crust
Ingredients
Equipment
Method
- Grab a large mixing bowl—bigger than you think you’ll need because this dough is going to rise! Add all the ingredients and mix by hand until everything is incorporated. It’s going to be a soft and slightly wet dough at first, but don’t worry—it will come together beautifully. Cover the bowl with a clean towel or a shower cap and let it sit at room temperature overnight. This bulk fermentation is where the magic happens!
- Now that your dough has had time to develop, it’s time to build strength. Wet your hands with a bit of water so the dough doesn’t stick, then perform a set of stretch and folds. Picture this: gently grab one side of the dough, stretch it up, then fold it over onto itself. Rotate the bowl and repeat this on all four sides until you’ve gone full circle. This helps create structure and those beautiful air pockets we love in a great pizza crust.Once you’ve completed your stretch and folds, cover the bowl again and pop it in the fridge for up to 36 hours. This step is optional, but if you have the time, it deepens the flavor and makes the dough even easier to work with.
- When you’re ready to make your pizzas, remove the dough from the fridge and let it rest at room temperature for about 30 minutes—just enough to take the chill off and make it easier to work with. While the dough is resting, generously flour your work surface to prevent sticking. Using a bench scraper, divide the dough into four equal portions and gently shape each piece into a smooth dough ball. Cover the dough balls with a clean tea towel and allow them to rest for another 30 minutes. This final resting period helps the gluten relax, making it much easier to stretch the dough into a thin, even crust without tearing.
- For Piezano Pizza Oven: Preheat your Piezano pizza oven to 800°F. While the oven heats, take one of your dough balls and begin shaping it into an 8-inch circle on a well-floured surface. Start by gently pressing from the center outward, stretching the dough with your hands. If it resists and shrinks back, let it rest for another 15 minutes to relax the gluten, then continue shaping until you reach your desired size.Once your dough is shaped, place it onto a wooden paddle and poke holes in the crust using a fork. Drizzle some extra virgin olive oil and use a brush to evenly distribute it over the crust. Add your sauce (I highly recommend our homemade marinara sauce) and toppings while the dough is on the paddle. Use the paddle to carefully transfer the pizza into the Piezano pizza oven. Cook for about 5-6 minutes until the bottom is golden brown with slight charring.For Conventional Oven: Turn on your oven’s broiler and place a cast iron skillet or a pizza stone inside to preheat. You want that skillet to be hot—this is key to getting a perfectly charred crust.While the skillet heats, take one of your dough balls and shape it into an 8-inch circle on a well-floured surface. Once the skillet is ready, carefully lay the stretched-out dough onto the hot skillet and poke holes in the crust with a fork. Drizzle some extra virgin olive oil and use a brush to distribute it evenly over the crust, then immediately add your sauce and toppings. Keep it simple so the crust remains the star—think fresh mozzarella, basil, and a drizzle of olive oil. Cook for about 5-9 minutes until the bottom is golden brown with slight charring. Keep an eye on it. Once the cheese is melted and bubbly, and the crust looks beautifully crisp, it’s ready to come out. Let it cool for just a few minutes before slicing in—you don’t want to burn your mouth, but you also don’t want to wait too long!
Notes
Best Tips For Sourdough Pizza Crust:
- Use a mature starter: Your sourdough starter should be bubbly and active for the best rise.
- Cold fermentation for enhanced flavor: If you have time, letting the dough sit in the fridge for 12-24 hours will develop a richer taste.
- High heat is key: A hot oven ensures a crispy crust, so don’t skimp on preheating.
- Less is more with toppings: Too many toppings can weigh the dough down and make it soggy—keep it light and fresh!


Reader Interactions